![]()
Setting Table Borders
A table border consists of the lines that separate a table’s cells form each other, and the table from the rest of your Web page. There are two types of table borders.
|
Border type |
Used by this type of user |
Illustration |
|
internal |
content author |
|
|
external |
site visitor |
|

Assigning an Internal Table Border
A table’s internal border is either on or off. You cannot specify other attributes.
To turn a table’s internal border off or on, follow these steps.
Note: If the table’s border is on, these steps turn it off. If it is off, they turn it on.
1. Place the cursor inside the table.
2. Right click the mouse.
3. Click Show/Hide border.
Assigning External Table Border Attributes
You can modify these external border attributes
color - see Assigning Table Border Color
size (thickness) - see Assigning Border Size
line selection - see Determining Which Table Border Lines Appear
Assigning Table Border Color
This section explains how to change the color of a table’s border (see example below).

To assign the color of your table’s border, follow these steps.
1. Place the cursor within the table.
2. Right click the mouse.
3. Select Set Table Properties.
4. Click the Table Properties tab.
5. Click the Border Color drop down (circled below).
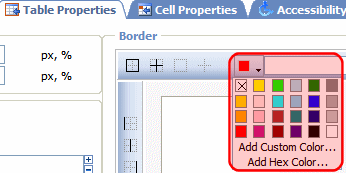
6. A color selection box appears. Click a color to apply to the table’s border.
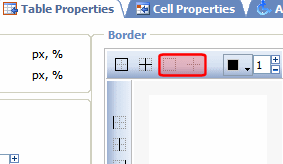
Assigning Border Size
You can also adjust the size of a table border. Size is measured in pixels.
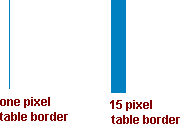
The border size only adjusts a table’s exterior border - it has no effect on the border between cells.
To assign a border size to your table, follow these steps.
1. Place the cursor within the table.
2. Right click the mouse.
3. Select Set Table Properties.
4. Click the Table Properties tab.
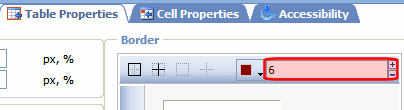
5. Enter a number of pixels into the Border field (circled below).
If you set a table’s border size to zero (0) but wish to view boundary lines while editing, see Assigning an Internal Table Border.
Determining Which Table Border Lines Appear
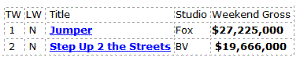
You may want to suppress some table borders. For example, the table below only shows horizontal lines.

To modify which border lines appear, follow these steps.
1. Place the cursor within the table.
2. Right click the mouse.
3. Select Set Table Properties.
4. Click the Table Properties tab.
5. Use the icons within the Border area to indicate which border lines should appear. Each icon has tooltip text that explains its function.
Note: In order to view the selected borders on the dialog, a border color must be assigned. See Assigning Table Border Color .
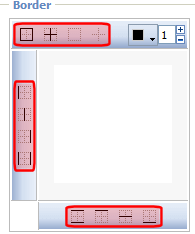
Note that if a table already has border lines but you want to start “fresh,” it is a good idea to remove all borders using the icons indicated below. Then, you can begin adding new ones.


![]()